Cheshire Bathroom Fitters & Designers

Based in Middlewich, we cover the Northwich, Sandbach, Knutsford and Holmes Chapel areas.

We offer a full supply, design and installation service.  Unlike many of our competitors, our main aim is to supply quality goods.  We only recommend and supply branded goods from established well known manufacturers.  The bathroom market is currently saturated with cheap unbranded imports and when repairs or replacements are needed, there is no parts or service solution available with these imports.  This often leads to a complete replacement which is needlessly costly.

We’re proud of our service and have built up a reputation for quality installation work.  You only have to view our testimonials page to see how happy some of our past customers were.  Also, why not view our gallery page for some inspiration for your next bathroom or ensuite?

Interested in What Our Customers Thought?

A Sample of Testimonials.....

  • Mike

    I have now had both my ensuite and bathroom fitted by Cheshire Bathroom Fitters and would have no hesitation in recommending their services.

  • A Bathroom & Ensuite in Middlewich

    This is the second bathroom that Martin has installed for us, having given our en-suite bathroom a makeover 18 months ago.

    Once again Martin has completed a superb job, removing our old suite, tiles (inc walls) fitting new plasterboard before retiling & converting our old bathroom into a great shower room.

    As ever Martin was punctual, clean & tidy and shows great craftsmanship.

    Martin always seems to be busy so we had to wait a while before he could fit us in – but the finished bathroom was well worth the wait & we wholeheartedly recommend him.

  • A Bathroom In Ollerton

    Sue and I are delighted with the result but equally delighted with how you went about achieving it.

    Your attention to detail is a quality that I admire highly. Indeed, a job well done.

    Many thanks

The Latest From Our Blog

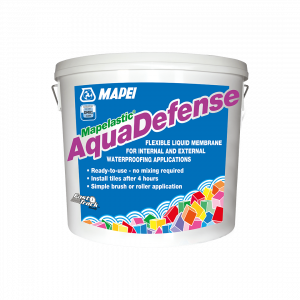
How To Use Waterproof A Shower Using Mapei Aquadefense

how to use mapei aquadefense


The Mapei Aquadefense Tanking Kit is a comprehensive solution for waterproofing wet areas in bathrooms, showers, and other spaces. This easy-to-use kit ensures a watertight barrier, preventing moisture penetration and potential damage. Follow these bulleted steps for a successful application:

  1. Gather Necessary Materials:

    • Mapei Aquadefence Tanking Kit
    • Clean mixing container
    • Drill with mixing paddle attachment
    • Paintbrush or roller
    • Utility knife
    • Reinforcement tape often included in kit form, otherwise use Mapei jointing tape
  2. Surface Preparation:

    • Ensure the substrate is clean, dry, and free of any dust or contaminants.
    • Repair any cracks or imperfections in the surface using suitable materials.
  3. Mix the Aquadefense Liquid:

    • Open the Aquadefence Liquid component (Part A) and mix it thoroughly with a drill and mixing paddle until a homogeneous consistency is achieved.
    •  
  4. Allow Mixture to Rest:

    • Let the mixed solution rest for a few minutes, allowing it to reach the desired consistency.
  5. Apply the First Coat:

    • Using a paintbrush or roller, apply the first coat of the Aquadefence mixture to the prepared surface. Ensure an even and consistent application, covering the entire area.  You should be looking for a thick coat of the liquid.
  6. Embed Reinforcement Tape:

    • While the first coat is still wet, embed the included Aquadefence reinforcement tape into the applied layer. Smooth out any air bubbles or wrinkles to ensure proper adhesion.
  7. Apply Second Coat:

    • After the reinforcement tape is in place, apply a second coat of the Aquadefence mixture, ensuring complete coverage and a uniform thickness.
  8. Seal Joints and Corners:

    • Pay special attention to joints and corners, applying additional Aquadefence mixture to create a seamless and watertight seal.
  9. Cure and Dry:

    • Allow the applied Aquadefence coating to cure and dry completely before subjecting it to water exposure. Follow the manufacturer’s recommended drying times.
  10. Perform Water Test:

    • Once fully cured, perform a water test to ensure the effectiveness of the Aquadefence Tanking Kit. Check for any signs of water penetration or leaks.

By following these steps, you can effectively use the Mapei Aquadefence Tanking Kit to create a reliable waterproof barrier in wet areas, providing long-lasting protection against moisture-related issues. Always refer to the product’s technical data sheet and follow the manufacturer’s instructions for optimal results.

Ideally you should wait around half an hour between coats.  Again, don’t skimp on the application. You should be looking for a thich coat of tanking to ensure that your shower area will be waterproof.


How to Install A Low Profile Shower Tray

Title: A Step-by-Step Guide to Installing a Low Profile Shower Tray

Introduction:

A low profile shower tray is a popular choice for modern bathrooms, offering a sleek and contemporary look while providing a practical and functional solution. Installing one may seem daunting, but with the right tools and step-by-step approach, it can be a straightforward DIY project. Here’s a guide to help you install a low profile shower tray successfully.  Please note that this guide is generic so you will need to check the manufacturer’s guide for your tray to ensure a correct installation.

If you are installing the tray directly onto the floor it is likely that you will need to remove some of the floor section first to access/install the waste outlet pipe.

Tools and Materials: Before you begin, gather the necessary tools and materials:

  • Low profile shower tray
  • Spirit level
  • Adjustable wrench
  • Screwdriver
  • Silicone sealant
  • Waterproof membrane
  • Screws
  • Saw (if adjustments to the tray are needed)

Installation Steps:

  1. Prepare the Floor:

    • Ensure the floor is clean, level, and capable of supporting the weight of the shower tray.
    • Use a spirit level to check for any uneven surfaces.
  2. Position the Tray:

    • Place the low profile shower tray in the desired position.
    • Check its alignment with the waste pipe and walls.
  3. Adjust if Necessary:

    • If the tray doesn’t sit perfectly, you’ll need to level it using sand and cement or tile adhesive.  There will usually be instructions from the manufacturer as to what is best.  If your tray is going on a leg set, you will need to adjust each leg to ensure that it is supported adequately in all directions.
  4. Install the Waste Outlet:

    • Connect the waste outlet to the tray according to the manufacturer’s instructions.
    • Ensure a watertight seal by using the provided gaskets. Sometimes you’ll also need to use a good quality silicon sealant
  5. Secure the Tray:

    • Using the adjustable wrench, tighten the tray’s adjustable legs to secure it in place if it is being positioned on a leg set.  
    • Ensure the tray is level in all directions using the spirit level.
  6. Apply Waterproof Membrane:

    • Install a waterproof membrane around the edges of the tray to prevent water leaks. You can buy tile upstand strip to do this.
  7. Seal the Edges:

    • Apply a generous amount of silicone sealant along the edges of the tray where it meets the walls and floor.
  8. Connect the Drainage:

    • Connect the waste pipe to the drainage system, ensuring a secure and leak-free connection.
  9. Test for Leaks:

    • Run water through the shower to test for any leaks.
    • Check the waste outlet and connections for any signs of water escaping.
  10. Final Checks:

    • Recheck the tray’s level after installation.
    • Allow the silicone sealant to dry completely before using the shower.

By following these steps and taking the time to ensure a proper installation, you can enjoy a stylish and functional low profile shower tray in your bathroom. If in doubt, consult the manufacturer’s instructions for specific details related to your particular shower tray model.

Can A Bathroom Be Fitted In A Day?

The prospect of having a bathroom fitted in a single day might sound like an ideal scenario for those seeking a quick and efficient makeover. However, the reality of fitting an entire bathroom in 24 hours depends on various factors.

While some companies offer express bathroom fitting services, the feasibility of completing the project in a day largely hinges on the scope and complexity of the work. Simple upgrades like replacing fixtures, installing pre-fabricated units, or refreshing the existing layout might be achievable within a tight timeframe.

On the other hand, comprehensive renovations involving plumbing reconfigurations, tiling, or custom cabinetry are more likely to extend beyond a day. Such projects demand meticulous planning, skilled labor, and adherence to safety and quality standards, which can elongate the timeline.

It’s essential for homeowners to communicate their expectations clearly with the bathroom fitter and obtain a realistic timeline based on the specific requirements of the project. While a one-day bathroom fitting might not be universally applicable, professionals can provide tailored estimates to ensure a balance between speed and precision, delivering a transformed and functional bathroom within a reasonable timeframe.

How Do I Find Someone To Fit A Bathroom?

  • Research Local Professionals: Start by researching local bathroom fitters in your area. Utilize online platforms, such as websites, directories, or social media, to identify reputable professionals with positive reviews.

  • Ask for Recommendations: Seek recommendations from friends, family, or colleagues who have recently undertaken bathroom fitting projects. Personal referrals can provide valuable insights into the reliability and quality of a professional’s work.

  • Request Portfolios: Review the portfolios of potential bathroom fitters to assess the quality and style of their previous work. This can help you determine if their design aesthetic aligns with your vision for the project.
  • Obtain Multiple Quotes: Contact several bathroom fitters to obtain detailed quotes for your project. Compare the scope of work, materials, and costs to make an informed decision based on your budget and preferences.

  • Interview Prospective Fitters: Conduct interviews with the shortlisted candidates. Discuss your ideas, expectations, and timeline for the project. This allows you to gauge their communication skills, expertise, and overall compatibility with your vision.

  • Check References: A good established bathroom fitter will have plenty of testimonials.

  • Verify Insurance Coverage: Ensure that the bathroom fitter carries insurance coverage. This protects you from liability in case of accidents or damage during the installation process.

By following these steps, you can navigate the process of finding a qualified and reliable professional to fit your bathroom, ensuring a successful and stress-free project.